Batch Invoicing
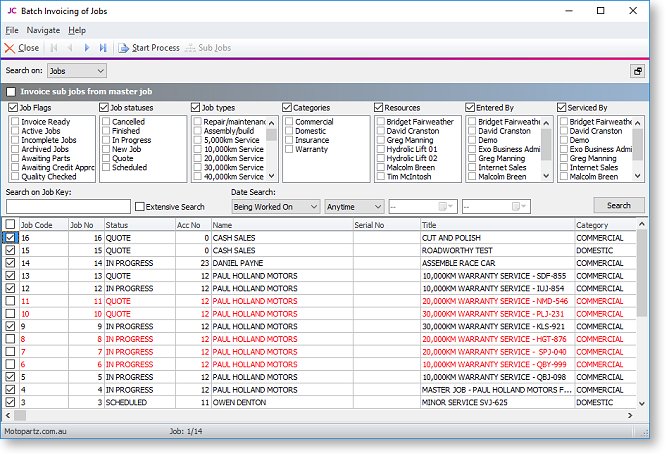
You can generate invoices for all lines marked "Ready to Invoice" in a single operation, using the Batch Job Invoicing function. Run the batch invoicing function by selecting the Batch Job Invoicing menu option.
Note: If this menu option is not available, you may need to add it at Setup > Menu Designer.

Note: If the If the Allow invoicing of sub jobs from master jobs Company-level profile setting is enabled, the option Invoice sub jobs from master job is available at the top of the window. Ticking this option means that for each master job, a single invoice will be generated for the master job and all of its sub jobs. If the option is not ticked, a separate invoice is generated for each sub job.
Searching Jobs
The top section of the Batch Job Invoicing window contains the job filters available on the Search tab of the Job Management Screen.
Set filters as necessary, then click Search to display all jobs that match the filter options, and that have lines that are set to the "Ready to Invoice" status.
The tick boxes next to each box can be checked or cleared to include or exclude the job from the invoicing process.
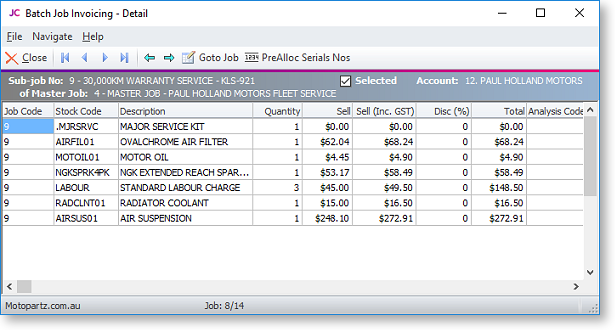
Double-clicking on a job displays the individual lines of the job:

Only lines with the status "Ready to Invoice" are displayed. If there are any problems with the job that mean it cannot be invoiced, these are displayed at the bottom of the window.
Click the Goto Job button to open the Job Details window to view all information about the job.
Click the ![]() PreAlloc
Serial Nos button to assign serial numbers to the job.
PreAlloc
Serial Nos button to assign serial numbers to the job.
Check or clear the Selected option to include or exclude the job from the invoicing process.
Processing Invoices
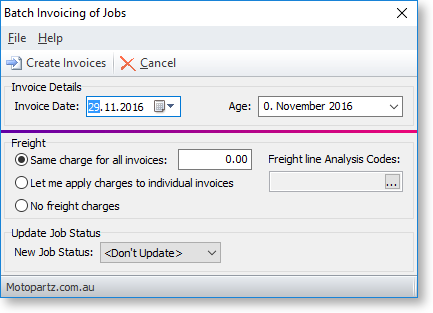
To begin processing the selected invoices, click the Start Process button.

Specify the following details:
|
Field |
Description |
|
Invoice Date |
Enter the date for all invoices in the batch |
|
Age |
Select the period that the invoices will be assigned to. |
|
Freight |
Select how freight charges will be applied. Choose from:
|
|
Update Job Status |
If you want to change the Job Status of all jobs invoiced in this batch, select a new status here; otherwise, select "<Don't Update>". Note: Only statuses that have the Jobs are complete characteristic ticked are available for selection here. |
Click the Create Invoices button to proceed.
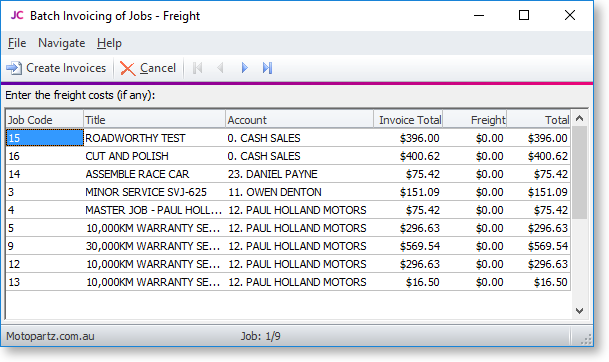
If you selected "Let me apply charges to individual invoices", the Create Invoices button is replaced by a Continue Process button. Click this button to assign freight charges for each invoice using the following window:

Enter an amount into the Freight column for each listed invoice (or leave the amount at $0.00). Once all charges are applied, click the Create Invoices button to proceed.
When the Create Invoices button is clicked, the system generates all invoices, as well as assigning serial numbers and updating job statuses where relevant. You are given the option of printing some or all of the invoices.
